Tag Archives: favorite kitchen tools

Friday Favorites: Banana Pudding Cheesecake

25 Apr

FRIDAY Favorites

When my husband and I were engaged, like most engaged couples, we created a wedding registry filled with items needed to establish our home. On a trip to a well known retail chain to create our wedding registry, we had the following conversation.

“We must register for a springform pan, ” my then fiance’ declares.

“A springform WHAT?!?!?” I inquire.

“You know, a springform pan,” he insists.

“A springform pan,” I slowly repeated with my mind racing. Dare I confess that I have no idea what it is? Will he love me even if I don’t know what a springform pan is? My palms start sweating, and I try not to hyperventilate.

“It’s the pan you need to make a cheesecake,” he informs.

“Gotcha!” I nod in affirmation and confidently pretend that I know what he’s referring to.

He took me down the Kitchen aisle and showed me this:

  I dared not mention that I had never seen a springform pan fearing that this was a deal breaker for marriage. I, again, confidently pretended to act like the springform pan and I were BFFs. In that moment, I made a mental note listing 3 important points: 1) Future husband loves cheesecake. 2) Find a tutor to teach me how to use said springform pan.
3) Find someone to teach me how to make cheesecake ASAP.

Thankfully, my fiance’ didn’t ask for the ring back when he discovered that the springform pan and I weren’t BFFs and had never met previously. Whew! With twelve years of marriage under our belts, I have not forgotten important point #1: my husband loves cheesecake. His love of cheesecake has led me on a quest for the perfect cheesecake recipe. I’ve tried various and sundry cheesecake recipes. Some were heavenly. Some were not.

For today’s and next week’s Friday Favorites, I will share our 2 favorite cheesecake recipes. One is sweet and one is salty. (Yes, you read that right! Have you ever heard of a salty cheesecake??!!?!? It’s amazing! Come back next Friday for that recipe!). Without further adieu, let me introduce you to our favorite sweet cheesecake: the Banana Pudding Cheesecake.

Banana Pudding Cheesecake

 Banana Pudding Cheesecake

adapted from Southern Living’s version

1 1/2 cups vanilla wafer crumbs
1/4 cup butter, melted
17 vanilla wafers (Yes, there is a reason that 17 vanilla wafers are specified.)
2 large bananas, chopped (ripe to overripe bananas work best)
1 TBSP. lemon juice
2 TBSP. light brown sugar
3 packages cream cheese (8 oz. package. I use Nefuchatel cream cheese)
1 cup granulated sugar (I scale it back to 1/2 cup)
3 eggs
1/2 cup vanilla wafers, crushed

1) Demolish vanilla wafers until you have 1 1/2 cups crumbs. (Kitchen Tip: I put whole vanilla wafers into a ziploc bag and crush them with a kitchen hammer until I have the correct amount.)

2) Combine melted butter and vanilla wafer crumbs. Press into bottom of greased, 9 inch springform pan. Take the 17 whole vanilla wafers and press them securely into the crust around the perimeter of the springform pan. (The curved side of the vanilla wafer should be against the pan’s edge.) It should look something like this…

photo (23)

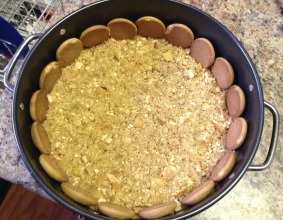
3) Bake the crust for 10 minutes at 350 degrees. Let the crust cool completely.

4) While crust is cooling, combine chopped bananas and lemon juice and add to sauce pan. Over medium heat, add in brown sugar and stir constantly until brown sugar has melted. This should only take about a minute.

5) Beat cream cheese with a mixer. Add in sugar followed by eggs, one at a time. Beat in vanilla. Stir in cooked bananas into cream cheese mixture. Pour cream cheese mixture into prepared crust.

6) Bake at 350 degrees for 45-55 minutes until the center is almost firm. Remove from oven and run a knife around the edge of the cheesecake to pull it away from pan’s edge. After I loosen the cheesecake from the pan’s edge, I pop open the springform pan. Sprinkle remaining 1/2 crushed vanilla wafers onto top of cheesecake. Cool on wire rack for about an hour. Cover and chill overnight.

And…that’s it! A cheesecake is much easier to make than I realized those many years ago when I was an engaged gal. If you have a Kitchen Aid mixer, it makes it even easier!  Don’t be afraid to make a cheesecake! I have been pleasantly surprised at how little effort it takes, and everyone will think you’re a professional chef! (Shhhhh, it’s our little secret! Don’t tell them how simple it is!) I made this for Thanksgiving, and my family asked where I bought it. That was a glorious moment in my (non-existent) cooking career. 🙂

Cutting Up A Pineapple: Thank You Pampered Chef!

17 Mar

image

When I had my Pampered Chef online party in January, I had a few friends ask me if the Pampered Chef Pineapple Wedger was really that magnificent and easy. Of course, I told them it was because, in my honest opinion, it is. 🙂 Since I a few friends purchased one, I felt a duty to show them how to use it. Since I can’t be in their kitchens with them, side-by-side, demonstrating how to use it, I thought I would post pictures of the process.

This post, in particular, is for and dedicated to my friend, Bethany. She was slated to come over to my house last week. The goal of our get together was not pineapple slicing. However, I had a fresh pineapple in the kitchen, so I told her that I would show her how I use my Pineapple Wedger while she was over. These plans quickly vaporized when our youngest woke up in the middle of the night puking his guts out. Yes, that was awesome. So, Bethany and my other Pampered Chef Pineapple Wedger purchasers, these pictures are for you!

image

1) Using a chef’s knife, I cut off the top, aka “the sharp poky leaves.” (Be careful, those things are dangerous.) Next, I cut off the bottom of the pineapple. For this step, only a minimum cut is required; this simply is useful for making the bottom level. At the conclusion of this step, you have 2 halves of the pineapple remaining. See the two circles in the upper left hand corner of this picture.

image

2) Locate the pineapple’s core. Do you see the dark yellow circle in the center? That’s your core!

image

3) Line the circle of your Pineapple Wedger with the pineapple’s core…and press down. I usually gently rock the Pineapple Wedger back and forth as I press down.

image

4) Viola! Now, I pull the 4 pieces of pineapple peel away from the Pineapple Wedger.

image

5) I remove the two halves of the pineapple from the Pineapple Wedger. All that is left in the center is the core.

image6) Then, I slice and dice the fruit. I repeat these steps for the other half of the pineapple.

7) I practice oodles of self-control and do NOT eat an entire pineapple by myself.

Be cautioned, fresh pineapple will not last long in your house. So, you may want to buy 2, 3, or 50 at a time! I especially like to purchase them when Aldi has them on sale for 99 CENTS!

Pumpkin Dinner Rolls-in your bread maker (or NOT in your bread maker if you don’t have one!)

22 Nov

image

If you’ve been following the conversations going on over at the Suzanne Shares Facebook Page, you’ll remember that I promised to post my Pumpkin Rolls recipe. These rolls have become a Thanksgiving and Christmas tradition in our home. This week I have been making lots of these as I gear up to host my family and my in laws for Thanksgiving. I thought I would share some of my favorite Thanksgiving recipes with you while I’m cooking!

I love these Pumpkin Dinner Rolls for a multitude of reasons! First and foremost, these rolls are scrumptious! You can’t eat just one. (You’ve been forewarned!) Plus, the pumpkin gives the rolls a brilliant golden color.  Any time that I make these rolls, I have requests for the recipe. (That’s always a good sign!) Another perk with this recipe is that it’s a great “make ahead” or “freezer” recipe. You can easily make them ahead of time, bake them, and freeze them. When reheating and serving them at a later date, you are not sacrificing taste. They come out of the oven tasting like you made them that day! The final reason for my adoration of this recipe is that it can be made in your bread maker using the Dough cycle! My bread maker (this one by Sunbeam) is one of my top 5 “must haves” in the kitchen appliance category. No, I’m not an amazing, I-should-have-my-own-show-on-Food-Network kind of cook, particularly when it comes to bread. However, thanks to my bread maker people think that I am–wink, wink. Let’s keep this as our little secret. 🙂

The original recipe is from Tammy’s Recipes blog. You’ll note in the comments that someone posted about using the recipe in a bread maker. This inspired me to try it in my bread maker, and it worked! I didn’t follow the instructions per the Comments section exactly, so I wanted to post my bread maker adaptation of the recipe.  Don’t forget to pin this recipe because you will definitely want to make it over Thanksgiving or Christmas! I have included an abundance of pictures for those of you who are new to making rolls from scratch. Again, the bread maker takes all of the hardship and guess work out of bread making, which is why I’m a huge fan of bread makers! (I have a gargantuan fear of recipes with yeast, so if I can do this, you can too!) First, I’ll list the recipe, and the step-by-step picture montage will follow.

Pumpkin Rolls (for your bread maker)
Yields 30-36 rolls
1 cup warm milk (warm to the touch, not HOT. Extremely hot water will kill the yeast, FYI)
1/4 cup water
2 tbsp. butter
1 cup pumpkin (I love this kind, and yes, I buy it a case at a time. No, I’m not weird.)
5 cups All Purpose or Bread flour (King Arthur is my favorite, and the price shown here on Amazon is HIGH. Wowzers. Just posting for reference! You can definitely find it cheaper elsewhere.)
1 tsp. salt
3 1/2 tsp. yeast (I buy yeast in bulk @ Costco. I keep it refrigerated to keep the large quantity preserved.)

Add the ingredients to your bread maker in the order listed above. Set to “DOUGH” cycle and start your engines machine. At the end of your DOUGH cycle, just know that the dough may slightly rise out of the container. (See picture below. HA!) After forming the rolls and placing on a baking sheet, let rise 30 minutes. After rising, bake @ 350 degrees for 15-17 minutes. Top with butter and serve immediately.

To freeze: cool completely and place inside freezer bag. Throw in your freezer.

To reheat and serve: Thaw completely. I usually pull them out of the freezer 24 hours in advance. Wrap in aluminum foil or place on a baking sheet, covered with foil. Reheat @ 350 degrees 8-10 minutes, or until warmed. Brush the tops with butter and serve immediately.

image

This is what the dough looked like at the end of the DOUGH cycle.

image

I dumped the dough onto my Silpat mat to start the task of making rolls. The dough does not stick to the Silpat mat. Oh, what a delight and joy my Silpat is! (Thanks for recommending the Silpat, Annie Laurie!)

image

Next, I form the dough into a rectangle as shown here.

image

I use my dough knife to cut the dough into four sections. No dough knife? Use a pizza cutter. I try to make them “equal,” but I’m not as gifted at that as I would like to be. 🙂

image

I work with the four sections one at a time. I cut one section in half as shown above.

image

I take the two halves and cut them into 7-9 rolls. Therefore, each of the 4 sections yields about 30-36 rolls, which is always my goal with this recipe.

image

I roll the rolls between my hands in a circular motion to form them into smooth round shapes. I place them side by side, slightly touching on a baking pan. I use this pan.
image

Here are the rolls all beautiful and ready to rise! I’m still working on my technique for forming the rolls. Mine are always a million different sizes, but no one eating them seems to mind. 🙂

image

Here’s what these beauties look like after 30 minutes of rising.

image

Here’s what they look like fresh out of the oven. Yes, you are correct. There are 4 missing rolls between the previous picture and this one above. I know not [SWALLOW] why.imageTo freeze, I break the rolls apart into 1 dozen sections. I place them in a 2.5 gallon freezer bag, leaving space between each dozen, and throw in the freezer. When I’m ready to serve these, I thaw 24 hours in advance, wrap them in aluminum foil and heat @ 350 degrees for 8-10 minutes or until warmed. Top with butter, and enjoy!

This post contains affiliate links. Please read my full disclosure policy here.

Pampered Chef #11-Mini-Serving Spatula (last day to order!)

28 Jan

I’m hosting an online Pampered Chef party… and today, Monday, January 28 is the last day to order! 🙂 So, don’t miss out! To celebrate, I’m featuring some of my favorite Pampered Chef items here on Suzanne Shares. Missed previous posts? Read all of them here

If you’ve been around Pampered Chef at all or know of anyone who has anything from Pampered Chef, it’s probably this little beauty shown here. I.LOVE.THIS.THING! Hello, blog readers, meet the amazing, Mini-Serving Spatula. Mini-Serving Spatula meet the, also, amazing readers of my blog. Great, now everyone knows each other. Love it. 🙂

The Mini-Serving Spatula is a must, must, must for your kitchen! Plus, it’s only $6…such a steal! Have you ever made a fresh batch of yummy, gooey brownies and tried to get the first piece out of the pan with a spatula that looks something like this…

You’re giggling right now, aren’t you? You’re giggling because you’ve done it, and you know what a disaster it is. You don’t just get one brownie out of the pan with this bad boy. You manage to unearth about 3 or 4 at a time. What.a.mess.

Viola! The Mini-Serving Spatula to the rescue! It only gets one brownie out of the pan at a time, thank you, and it does it neatly and with much grace. Thank you, Mini-Serving Spatula. It’s petite size and design allows you to maneuver it easily to get brownies, cake, or any other yummy dessert from your dish. It, also, beautifully unpries from my Large Bar Pan those yummy, made-from-scratch chocolate chip cookies that we like to eat here at the Mosley casa. I love it because it’s the perfect size for serving desserts. It takes what used to be really awkward with my spatulas like the one above and makes it easy, seamless and mess-free. So, if you’ve not tried anything ever from Pampered Chef, make this the day that you change that. I promise you will love, love, love this Mini-Serving Spatula. It’s a kitchen essential for me, and I’m sure you’ll find that to be true in your house as well.

Ready to order one?? Here’s how…

To participate in my show, shop online here. You’ll need to search for my name (last name Mosley) and click through to order. Thanks to my fabulous neighbor, Aimee Howell, wonderful Pampered Chef consultant for allowing me to host a party! And…no worries if you don’t live anywhere near me! When you order online, you can have it shipped directly to your door! Oh, how I love shopping online. 🙂  Thank you, thank you, thank you!! Party ends today, Monday, January 28 at 11:59PM CST, so don’t miss out.

Pampered Chef favorites #9 and #10–Glass storage containers

26 Jan

I’m hosting an online Pampered Chef party…for only a few more days! 🙂  (Monday 1/28 is the last day to order). To celebrate, I’m featuring some of my favorite Pampered Chef items here on Suzanne Shares. Missed previous posts? Read all of them here. I’m sooooooooo close to my goal, so if you need some Pampered Chef goodies, I wold love, love, love for you to order them through my party! 🙂 Thanks a million!

One afternoon when I was at my neighbor Aimee’s house (the fabulous Pampered Chef consultant through whom I’m having my Pampered Chef party), and she commented that she was trying to get rid of plastic from her home. “Interesting,” I thought. I had never given that much thought but later read online some interesting things about plastic. I decided that I would do my best to monitor our use of plastic in the kitchen (especially avoiding it in the microwave). Also, I thought I would start replenishing our storage containers with glass ones as the plastic ones got old and needed replacing. This was all about the same time that I had my Pampered Chef party last year. I had a friend order the 2-cup Prep Bowls (#1742), and she said she was going to use them for storing leftovers. Brilliant! I decided to get some for our house, too. (There are also 1-Cup Prep Bowls-item #1825 and 3-Cup Prep Bowls-item #1743). We have the 2-cup and 3-cup Preps Bowls and really, really loved these! I don’t use them for “prep” as much as I do leftovers. It’s also super convenient with leftovers to take off the lid and just pop the glass bowl into the oven or toaster oven. Less dishes for me to wash, too!

These great Leakproof containers were a Host Special at the time, too, so I ordered those for us as well. These also are fabulous! I love the glass storage, and the leakproof, snap-on-tight lids are wonderful. With little boys in my home and in my refrigerator, I need all the help that I can get minimizing spills. They have 1 1/2 cups (item #1201) , 3 cups (item #1202) , 5 1/4 cups (item #1203) or 8 1/4 cups (item #1204) storage options. We have some of all 4 of these, and I can’t say enough about them!

No judgement from me if you have plastic containers. We still have some in my cabinets. 🙂 We’re all about taking baby steps, right?!?!? If you are making the switch from plastic to glass and looking for some stellar, glass storage options, I would highly recommend these from Pampered Chef! We love, love, love them!

To participate in my show, shop online here. You’ll need to search for my name (last name Mosley) and click through to order. Thanks to my fabulous neighbor, Aimee Howell, wonderful Pampered Chef consultant for allowing me to host a party! And…no worries if you don’t live anywhere near me! When you order online, you can have it shipped directly to your door! Oh, how I love shopping online. 🙂 Thank you, thank you, thank you!!

Pampered Chef favorite #9–Medium & Large Scoops (a lifesaver with muffins & cupcakes!)

25 Jan

I’m hosting an online Pampered Chef party…for only a few more days! 🙂 (through 1/28). To celebrate, I’m featuring some of my favorite Pampered Chef items here on Suzanne Shares. Missed previous posts? Read all of them here.

Last night, I made 4 dozen of one of our family’s favorite breakfast items, Breakfast Power Muffins. Yes, 4 dozen! This is a great, freezeable recipe, by the way, which is why I make so many at a time. (Instructions on how to freeze them is included with the recipe.) Making 4 dozen muffins at once can be quite labor intensive, but thanks to one of my favorite Pampered Chef tools, the Large Scoop (item #1790) the intensity of my labor has lessened. The Large Scoop works much like the old fashioned ice cream scoops I grew up with as a kid. As you squeeze its handle, there is a mechanism that goes back and forth inside the scoop to scrape free what’s inside the scoop. Before I had the Large Scoop, I would use a variety of different things to try to get the perfect amount of muffin batter easily into the muffin pan. I tried spoons, which I inevitably always had to scrape with my fingers to get out the rest of the batter (sanitary?? I think not!). Sometimes I would use my liquid measuring cups and pour them into the muffin pan. Boy was that a mess! Transferring the muffin batter to the measuring cup and then pouring the batter into the muffin pan. Whew! Doing this 48 times (and having to continually refill the measuring cup with batter from the mixing bowl!) was extra, extra labor intensive! I’m just tired writing about it! 🙂

I saw the Large Scoop (and there’s also a Small #2530 or Medium #2540 one, too!) in the Pampered Chef catalog and thought, “Hmm, these would work well with my making my muffins.” So, I asked my fabulous Pampered Chef consultant what the Scoops were used for and she said, “They’re great to use for scooping out cookie dough or muffin and cupcake batter, or even ice cream.” Okay, I’m sold! So, I got the Medium and Large Scoops and have been a happily, pampered chef ever since! I use the Large Scoop for my muffins or cupcakes. I’ve used the Medium one for those as well, too (whenever the Large one is in the dishwasher!), and it also works well to scoop muffin batter into mini muffin pans since its smaller than the Large scoop. So, if you make lots of muffins, cupcakes or cookies, I would highly recommend any of the 3 scoops–Small, Medium or Large!

Which muffin pan do you use for your Breakfast Power Muffins? Well, glad you asked! 🙂 I have and use the Pampered Chef 12 Cup Muffin Pan (Item #1465) with my muffins, and LOVE, LOVE, LOVE it! It’s another great stoneware treasure that I love having in my kitchen! 🙂 No more metal, nonstick coating in our muffins…just like my cookie sheets! 🙂

Ready to order one of the Scoops or the Stoneware Muffin Pan? Here’s how…

To participate in my show, shop online here. You’ll need to search for my name (last name Mosley) and click through to order. Thanks to my fabulous neighbor, Aimee Howell, wonderful Pampered Chef consultant for allowing me to host a party! And…no worries if you don’t live anywhere near me! When you order online, you can have it shipped directly to your door! Oh, how I love shopping online. 🙂 Thank you, thank you, thank you!! Party ends Monday, January 28, so don’t miss out.

Pampered Chef favorites #8-Large Bar Pan (stoneware!)

24 Jan

I’m hosting an online Pampered Chef party…for only a few more days! 🙂   (through 1/28). To celebrate, I’m featuring some of my favorite Pampered Chef items here on Suzanne Shares. Missed previous posts? Read all of them here.

Can you believe that I had NO stoneware pans in my home until 12 months ago!?!? I know, I know. I’m soooooooooooo behind the times. I decided to take the plunge because the nonstick surface on my metal cookie sheet was peeling off. YUCK! Metal with your chocolate chip cookies, Mosley boys? Yeah, disgusting. I decided that my family probably didn’t want to ingest metal with every chocolate chip cookie or roasted sweet potato that I frequently made on that metal cookie sheet. Gross, gross, gross.

So, I took the plunge…no more metal cookie sheet. Hello, Pampered Chef stoneware! I think one of the most common and probably best selling Pampered Chef products is the round pizza stone. I went to my friend Aimee, Pampered Chef Consultant extraordinaire and told her that I was ready to invest in some stoneware. She did what any great consultant should do, she consulted! Here’s how our conversation went:

Aimee: What are you planning to do with the round pizza stone? Would you ever cook something that you would need to have a lip around the pan so that the contents wouldn’t spill off the stone?”

Me: “Hmm…great questions. Actually, one of the main uses I had for my metal cookie sheet was roasting sweet potatoes and other sundry vegetables. I’ll also use it for cookies and pizza.”

Aimee: “I would actually recommend the Large Bar Pan (item #1445). It is rectangular instead of round. But if you roast a lot of vegetables, they would probably slide off the round pizza stone as you take it in/out of the oven. There is no lip around the edge of the round pizza stone. With the Large Bar Pan, it still functions like the round pizza stone, you can bake cookies on it and continue to make homemade pizza (just rectangular instead of circular). It’s the size of a jelly roll pan for cakes (which was important to me because of this heirloom recipe), and you can continue roasting your vegetables. You can do all of these in the Large Bar Pan, or you can order the Round Pizza Stone and cook some of these things.”

Me: “Oooooooooh, great point! Okay, scratch the Round Stone and order me the Large Bar Pan!”

Thank you, Aimee, for sharing your fabulous Pampered Chef wisdom with me! I’m one happy customer a year later. First and foremost, we’re no longer eating non-stick metal coating with each bite of my homemade chocolate chip cookies. Whew! That’s a relief to my internal organs, I’m sure. I’m also enjoying roasting away with sweet potatoes, cauliflower, broccoli, and on and on the list goes. All of these things with my fabulous Pampered Chef Large Bar Pan. (AND…I also have the small and medium ones, too. They’re pretty fabulous, too!). Now, shop, shop away and order some Pampered Chef. 🙂 Here’s how…

To participate in my show, shop online here. You’ll need to search for my name (last name Mosley) and click through to order. Thanks to my fabulous neighbor, Aimee Howell, wonderful Pampered Chef consultant for allowing me to host a party! And…no worries if you don’t live anywhere near me! When you order online, you can have it shipped directly to your door! Oh, how I love shopping online. 🙂 Thank you, thank you, thank you!!


Pampered Chef favorite #7–Salad Chopper

23 Jan

I’m hosting an online Pampered Chef party…for only a few more days! 🙂  (through 1/28). To celebrate, I’m featuring some of my favorite Pampered Chef items here on Suzanne Shares. Missed previous posts? Read all of them here.

This is a relatively new Pampered Chef product…the Salad Chopper. 🙂 I got it last year and honestly, wasn’t sure if I really needed it.  The thing that pushed me over the edge last year was when my neighbor, Aimee, the fabulous Pampered Chef consultant I’m hosting the  party through, told me that it worked well in chopping cooked chicken. Fast forward a year later, and I’m so glad I bought it! I make lots of chicken salad around the Mosley home, and it’s so nice to use the Salad Chopper (aka “Chicken” Chopper) to chop the chicken once it’s boiled. Chop, chop, chop the chicken with my Salad Chopper, a few grapes, celery salt and mayo, stir, stir, stir, and Chicken Salad…viola!

It also works wonderfully well at its namesake–chopping salad! I buy lots of Artisan lettuce from Aldi (have you tried it?!?!? It’s lovely!), which comes intact. This requires me washing and cutting up the lettuce. This kitchen prep is a piece of cake now that I have the Pampered Chef Salad Chopper! 🙂 Seriously, my favorite part of all of my Pampered Chef products is that they drastically slash my “prep time” in the kitchen. When you’re cooking from scratch and have 3 ravenously hungry boys, minimizing kitchen prep is a beautiful thing.

Need to cut your kitchen prep time? Order this great Salad Chopper, or any other fabulous Pampered Chef product! I would love for you to order with my catalog party. Interested? Here’s how…

To participate in my show, shop online here. You’ll need to search for my name (last name Mosley) and click through to order. Thanks to my fabulous neighbor, Aimee Howell, wonderful Pampered Chef consultant for allowing me to host a party! And…no worries if you don’t live anywhere near me! When you order online, you can have it shipped directly to your door! Oh, how I love shopping online

Pampered Chef Favorite #5: Core & (oh-so-much) More

21 Jan

I’m hosting an online Pampered Chef party for one more week (through 1/28). To celebrate, I’m featuring some of my favorite Pampered Chef items here on Suzanne Shares. Missed previous posts? Read all of them here.

My 3-always hungry-eat every 30 minutes-their mom fixes food for them all day-sons have benefited greatly from the Pampered Chef products that are in the Mosley kitchen. They love when it’s kiwi and strawberry season thanks to the Egg Slicer Plus, which, by the way, I never use for eggs. (So, you don’t have to use it for eggs either. Egg haters unite!) My neighbor, Aimee, the fabulous Pampered Chef consultant who is helping me host this fabulous Pampered Chef Online party told me about another Pampered Chef treasure that’s made my “Favorites” list! It’s the Core and More (item #1176), and you need it in your kitchen, blog readers….no joke!

Of course, you can use the circle end to make beautiful cantaloupe, watermelon and honeydew balls. Those are always beautiful and perfect (and yummy!) for a wedding or bridal shower. My friend Annie Laurie, also, clued me in that you can use the circular end to remove the core of an apple or pear after it’s sliced in half (glorious!) Those are wonderful uses for this Pampered Chef treasure, BUT neither are my favorite use for this tool. Does anyone have a guess as to my favorite use?!?!!?

If you guessed capping strawberries, you’d be correct! Aimee taught me this great trick with the Core & More. You can cap the strawberry in 2 seconds flat, and it allows you to have more strawberry to eat and enjoy! Before the Core & More came into my life kitchen, I would cut off what seemed to be half of the strawberry in order to get rid of the leaves. So, in essence I was throwing half of each strawberry away, and with 3 boys who need every bit of caloric intake I can offer, the Core & More has been a great help! Now, I cap all of them quickly, and then I slice them up with my Egg Slicer Plus! We have a bowl full of strawberries prepped and ready to be eaten at all times. (And I really love storing them in this Pampered Chef glass container! 🙂

So, if your home is filled with strawberry fanatics, you need to add the Core & More (and the Egg Slicer Plus…for slicing!) to your Shopping Cart now. You’ll thank me later,  I promise!

To participate in my show, shop online here. You’ll need to search for my name (last name Mosley) and click through to order. Thanks to my fabulous neighbor, Aimee Howell, wonderful Pampered Chef consultant for allowing me to host a party! And…no worries if you don’t live anywhere near me! When you order online, you can have it shipped directly to your door! Oh, how I love shopping online. 🙂

Pampered Chef favorites #4: Citrus Peeler

20 Jan

I’m hosting an online Pampered Chef party…for only one more week! 🙂 (through 1/28). To celebrate, I’m featuring some of my favorite Pampered Chef items here on Suzanne Shares. Missed previous posts? Read all of them here.

If you’ve never peeled an orange using a Pampered Chef  Citrus Peeler, you’re missing out! Don’t you hate when you’re trying to de-skin that beautiful navel orange and you break your finger nail?!? Ugh! Peeling citrus=no fun! I grew up with these wonderful orange peelers, and it, literally, takes the work out of peeling an orange.

To use, start at the top, use the Citrus Peeler to cut into the skin all the way around back to where you started. Then, repeat on the other section of the orange, starting & stopping again at the top. You’ll now have 4 sections of orange peel to easily pull off and remove. If the peel is still giving you trouble, use the curved end to pry the peel away from the flesh. Marvelous! Break open the orange and enjoy! What can take 5 minutes or more (and come with heaps of frustration!) is easily a 30 second task with the Pampered Chef Citrus Peeler. I love that Pampered Chef makes it easier, more efficient to eat healthy foods!

The other great thing about this Citrus Peeler is the price. It’s $1! Yup, that’s right! 100 pennies, 20 nickels, 10 dimes, 4 quarters. One buck. Love it! I have several of these to send in different lunch boxes and because we use them so frequently. So, add this to your wish list and head on over to my Pampered Chef party and add one to your cart!

To participate in my show, shop online here. You’ll need to search for my name (last name Mosley) and click through to order. Thanks to my fabulous neighbor, Aimee Howell, wonderful Pampered Chef consultant for allowing me to host a party! And…no worries if you don’t live anywhere near me! When you order online, you can have it shipped directly to your door! Oh, how I love shopping online. 🙂